


All ARC Raiders Map Conditions
ARC Raiders drops you into a world overrun by hostile machines, where every raid to the surface is a gamble between walking away rich or not walking away at all. You spawn in, scavenge what you can, fight off ARC robots and other players, and get out before time runs out.
What makes each raid feel different are map conditions, modifiers that shift what you'll find up there, who's hunting you, and how hard extraction will actually be.
Also Read: How to Get Blueprints in ARC Raiders: Complete Guide
What Are Map Conditions in ARC Raiders?
Map conditions are dynamic modifiers that change how a raid plays out before you even hit the ground. They affect enemy behavior, loot availability, weather hazards, extraction point access, and sometimes spawn entirely new threats on the map. Because of this, no two raids feel the same.
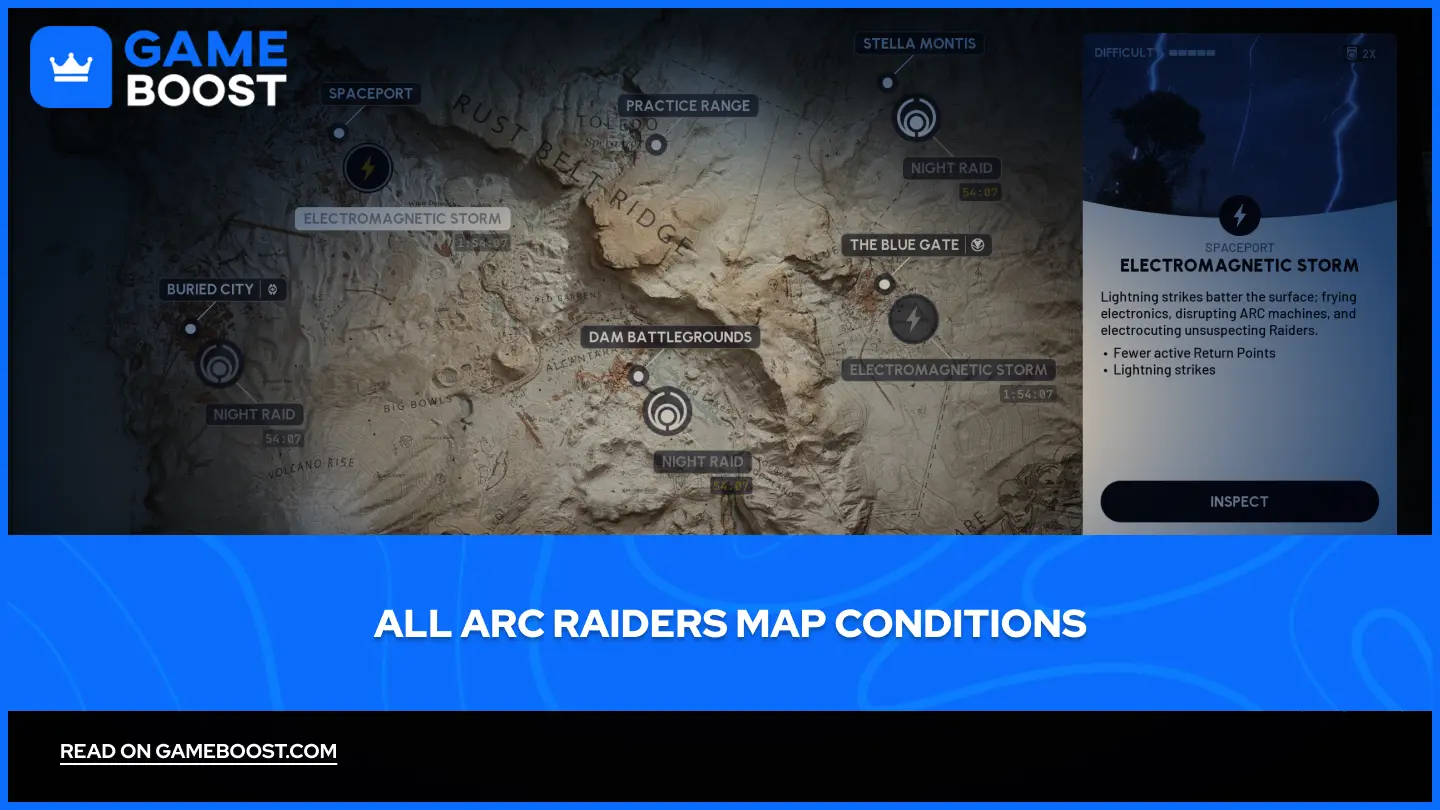
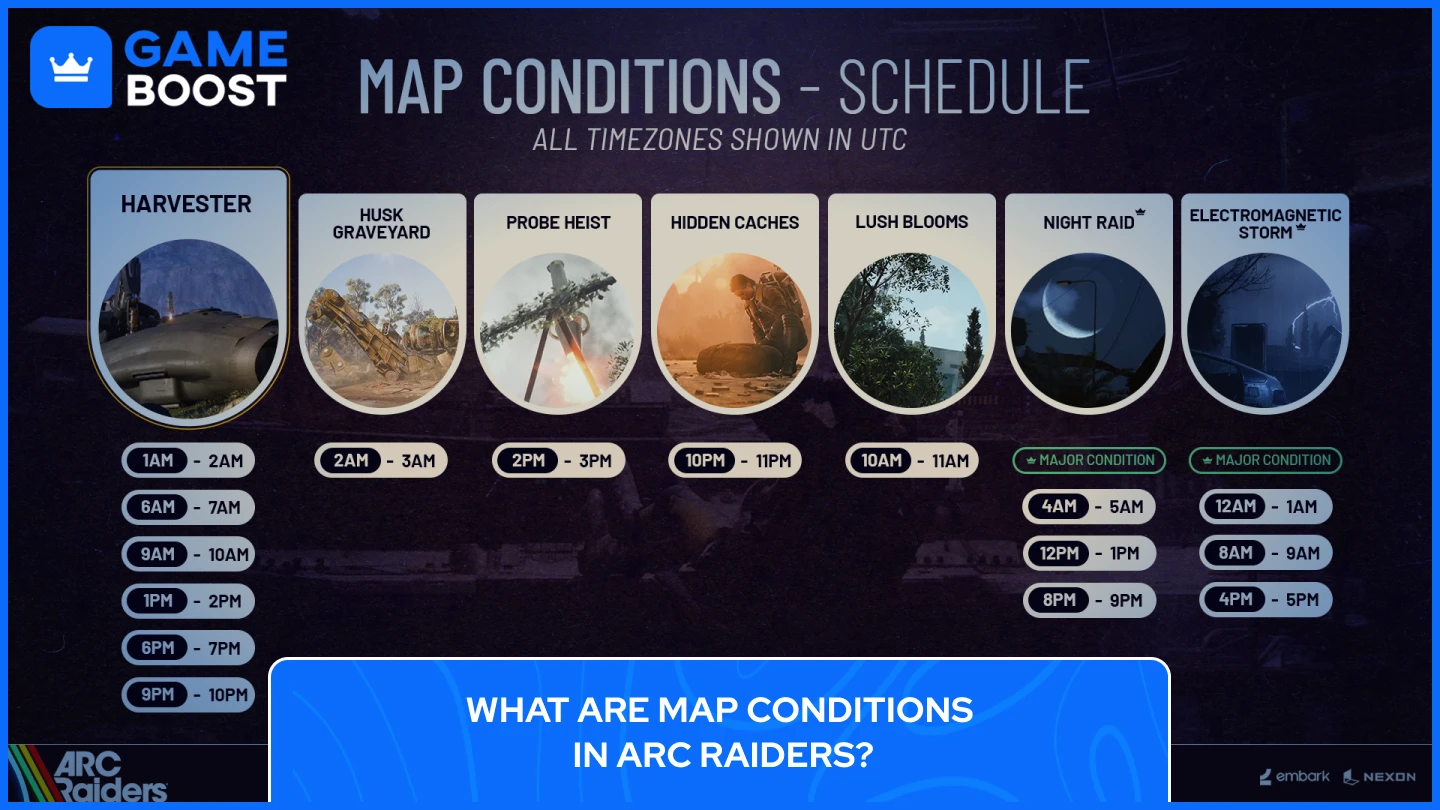
Conditions in ARC Raiders rotate on timed schedules throughout the day, so what's active when you log in won't necessarily be active an hour later. Some conditions appear across all maps, while others are tied to specific locations like Spaceport or Buried City.
Before queuing, you can check the ARC Raiders map condition schedule to see which conditions are currently live by going to the map selection screen and clicking the grey icon on each map. It takes a few seconds and can easily decide if the raid is worth running at that moment.

All Available Map Conditions in ARC Raiders
ARC Raiders features multiple map conditions that rotate on timed schedules throughout the day. Some conditions simply increase loot availability, while others introduce weather hazards, spawn powerful bosses, or change enemy behavior patterns.
Map Condition | Type | Description |
|---|---|---|
Cold Snap | Major | A sudden snowstorm blankets all outdoor maps, dealing frostbite damage to any raider caught outside too long in exchange for increased loot value near major spots. |
Electromagnetic Storm | Major | Lightning strikes actively target the map, reducing extraction points and Raider Hatches while rewarding those who brave it with 2x Trials points and strong loot. |
Hidden Bunker | Major | Four rooftop antennas across Spaceport must be activated to unlock an underground bunker filled with strong loot and terminal data, awarding 2x Trials points on completion. |
Locked Gate | Major | A group has triggered Blue Gate's emergency shutdown protocol, and players must track down 4 keycards scattered across the map to override it and claim the hidden loot inside. |
Night Raid | Major | The map runs under full nighttime conditions with reduced visibility, increased ARC aggression, fewer extraction points, and 2x Trials points for those willing to push through. |
Hurricane | Major | Strong winds are sweeping across the surface, affecting large parts of the area. Visibility and hearing may be reduced, so stay alert. |
Close Scrutiny | Major | Groups of Surveyors and Vaporizers are scanning for valuable materials. Their discoveries could prove worthwhile, if you're prepared for resistance. |
Bird City | Minor | Birds have nested in Buried City's chimneys, hiding valuable trinkets and Rubber Ducks, but more ARC drones patrol the skies, and rooftop traps increase the risk. |
Harvester | Minor | A massive ARC harvesting machine spawns in a fixed open area, guarded by The Queen, and holds high-tier loot and blueprints behind breakable entrances and periodic flame purges. |
Husk Graveyard | Minor | Large numbers of ARC machines have gone down across the map, leaving Baron Husks packed with parts and power cells, though some are electrified and will stun players on breach. |
Launch Tower Loot | Minor | High-tier loot sits locked at the top of Spaceport's Launch Tower, requiring players to find fuel cells, power the generator, and ride the elevator to reach it. |
Lush Blooms | Minor | Favorable weather causes fruits, mushrooms, and plant materials to grow in abundance across the map, with fruit trees yielding double or triple their normal output and Wicker Baskets spawning nearby. |
Matriarch | Minor | A powerful roaming ARC boss patrols the map and drops legendary crafting components when defeated, though it's a tough fight best approached with a coordinated squad. |
Prospecting Probes | Minor | ARC floods the map with Probes and Couriers dropping from the sky, making it one of the best conditions for farming mechanical components with less risk of being rushed by other players. |
Uncovered Caches | Minor | Storms have unearthed old raider caches across the map that must be located by sound and excavated before they self-destruct, each containing ammo, healing items, and occasionally blueprints. |
Beachcombing | Minor | Scouts have discovered a variety of trinkets and small finds buried in the sands around Riven Tides, along with a few less welcome things. Raiders are encouraged to use a Dockmaster's Detector to uncover them. |
Major conditions award double the standard Trials points, making them valuable for weekly challenge farming despite the increased difficulty. You can check active conditions on the map selection screen before starting a raid by clicking the grey icon to see which special conditions are currently live on each map.

ARC Raiders Major vs. Minor Conditions
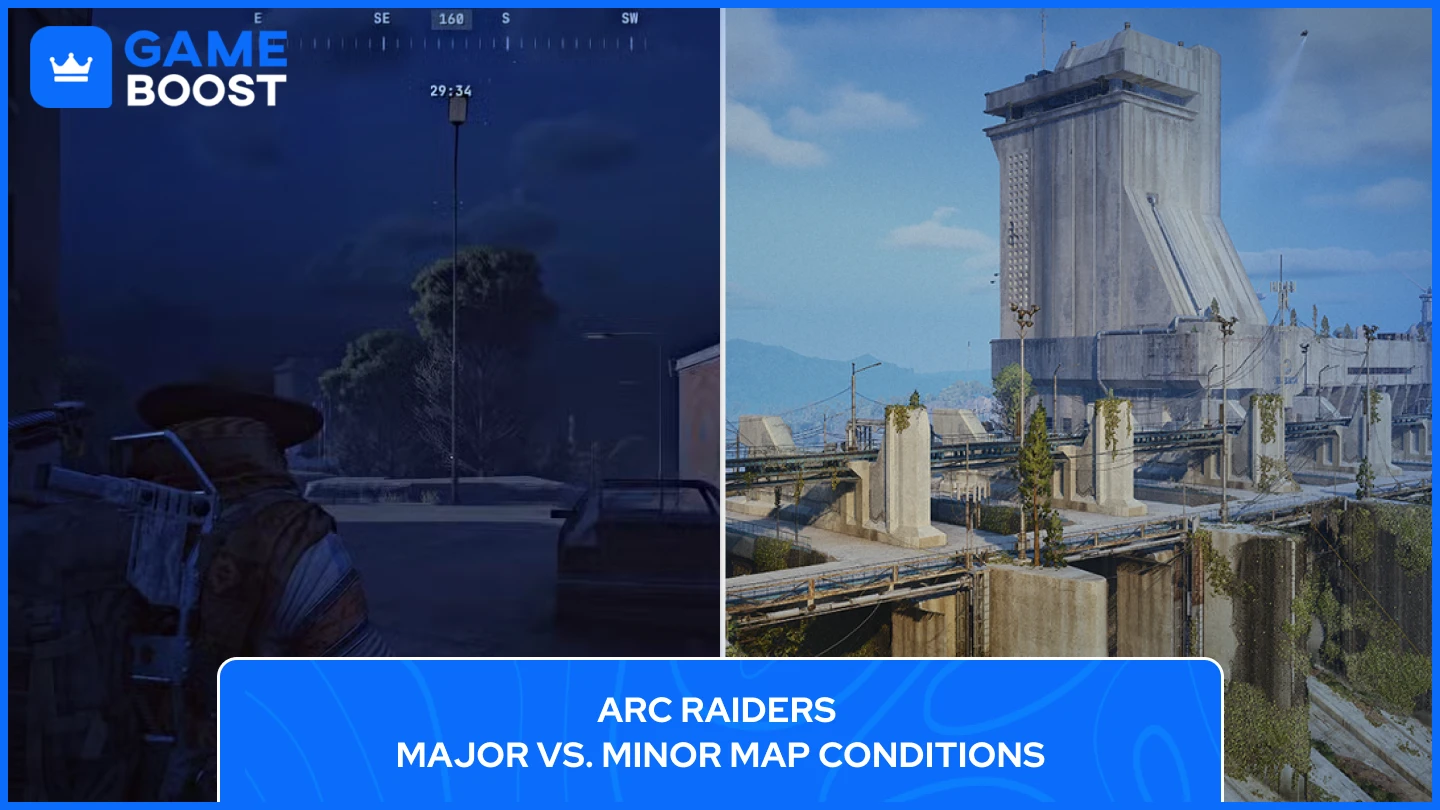
Map conditions are split into two tiers, Major and Minor, each with a different level of impact on your raid. Major conditions change the map in a big way, think restricted extractions, weather damage, or map-wide events that force you to adapt fast. On top of that, every Major condition rewards double the standard Trials points, which makes them worth pushing through for weekly challenge progress.
Here's how both tiers compare across the factors that matter most:
Major Conditions | Minor Conditions | |
|---|---|---|
Trials Points | 2x standard | Standard rate |
Risk Level | High | Low to moderate |
Extraction Points | Often reduced | Mostly unaffected |
Loot Quality | High across the map | High in specific areas |
Best For | Trials farming, high-tier loot | Resource farming, targeted loot |
Solo Friendly | Rarely | Generally yes |
Minor conditions are more contained. They add a specific mechanic, a boss spawn, or extra loot in a particular area without flipping the whole raid on its head, making them a safer pick for solo players or anyone farming specific materials.
Final Words
Map conditions are one of those systems that look simple on paper but quietly shape every decision you make once you're on the surface. Knowing which map condition in ARC Raiders is active before you queue is the difference between a productive raid and losing your best gear to a storm you weren't prepared for.
If you're still getting familiar with the system, Lush Blooms and Prospecting Probes are the most forgiving ARC Raiders conditions to learn on with low threat, predictable loot, and no major mechanics to worry about. On the other end, Night Raid and Electromagnetic Storm are the hardest map conditions the game throws at you, with reduced extraction points, increased ARC aggression, and zero margin for bad decisions.
ARC Raiders rewards players who pay attention to the small details, and map conditions are a big part of that. Check what's live before you drop, match your loadout to what you're walking into, and you'll extract more than you lose.
ARC Raiders & GameBoost Products
“ Mustafa Atteya has been writing about gaming and esports since 2023, specializing in competitive game content and player improvement guides. At 25, he brings both hands-on gaming experience and professional SEO writing expertise to the GameBoost team.”

.webp?v=1763108922)