


How to make a Gamepass on Roblox? (PC, Mobile & PLS Donate)
Roblox has grown into one of the largest gaming platforms in the world, with millions of creators building experiences and earning real money through Robux. At the center of this creator economy are Gamepasses, which let developers monetize their work while giving players access to premium features and exclusive content.
If you're a Roblox creator looking to earn from your experience, or if you want to set up a donation system through games like PLS Donate, understanding how to create and manage Gamepasses is essential. The process is simpler than most people expect, but knowing the right steps makes all the difference.
Summary - How to Make a Gamepass on Roblox?
A Roblox Gamepass is a one-time purchase that gives players permanent perks-
Creators keep 70% of each Gamepass sale, with Roblox taking a 30% marketplace fee on all transactions.
You must publish your Roblox experience and set it to Public before you can create or sell any Gamepasses.
Creating a Gamepass requires accessing the Creator Hub at create.roblox.com, navigating to your experience's Passes section, and filling in the name, description, and image.
The Roblox mobile app doesn't support Gamepass creation, but you can use your mobile browser in desktop mode to access the same Creator Hub features.
In PLS Donate, creators receive only 60% of donations because the game takes an additional 10% cut on top of Roblox's 30% fee.
Gamepass rewards don't activate automatically in your game unless you add scripts in Roblox Studio to detect pass ownership and grant benefits.
The Pass ID is required for scripting and can be copied by clicking the three dots on your pass thumbnail and selecting "Copy Asset ID".
PLS Donate stands are free to claim and automatically display your Gamepasses as donation buttons once you've created and priced them.
What is Roblox Gamepass?
A Gamepass (officially called an Experience Pass) is a one-time purchase that players make with Robux to unlock special perks in your game. Once someone buys it, they own it permanently and get access to exclusive features every time they play your experience.
Gamepasses can unlock virtually anything you want:
VIP areas or private servers
Special abilities, weapons, or power-ups
Exclusive avatar items or pets
Skip timers or get extra resources
Cosmetic upgrades like custom effects or badges
Each Gamepass is tied to a specific experience. If a player buys a VIP pass in your racing game, it only works in that game, not in other Roblox experiences. This gives you complete control over what you offer and how you reward your community.
For creators, Gamepasses represent a real revenue stream. You keep 70% of every sale, with Roblox taking a 30% marketplace fee. If you price a pass at 100 Robux, you earn 70 Robux per purchase. Many successful Roblox developers earn thousands of Robux monthly through well-designed Gamepasses that add genuine value to their games.
How to Create a Game Pass on Roblox?
Before you start, your Roblox experience must be published and set to Public. If it's still Private, you won't be able to create or sell Gamepasses.
Once your experience is live and accessible, follow these steps to create your Roblox Gamepass:
Step 1: Access the Creator Hub
Open your web browser and go to create.roblox.com. Log into your Roblox account if you haven't already. Once you're in, you'll see the Creator Dashboard. Click on "Creations" in the left sidebar to view all your published experiences.
Step 2: Select Your Experience
Find the game where you want to add a Gamepass. Click on the experience name to open its management page. This takes you to the main configuration area where you can adjust settings, add assets, and manage monetization.
Step 3: Navigate to Passes and Create the Roblox Gamepass
In the left menu, scroll down to the "Monetization" section. Click on "Passes" to open the Gamepass management area. This is where all your current and future Gamepasses will be displayed.
Click the "Create a Pass" button in the center of the screen to start creating your Roblox Gamepass. A creation form will appear where you'll set up the basics of your Gamepass.
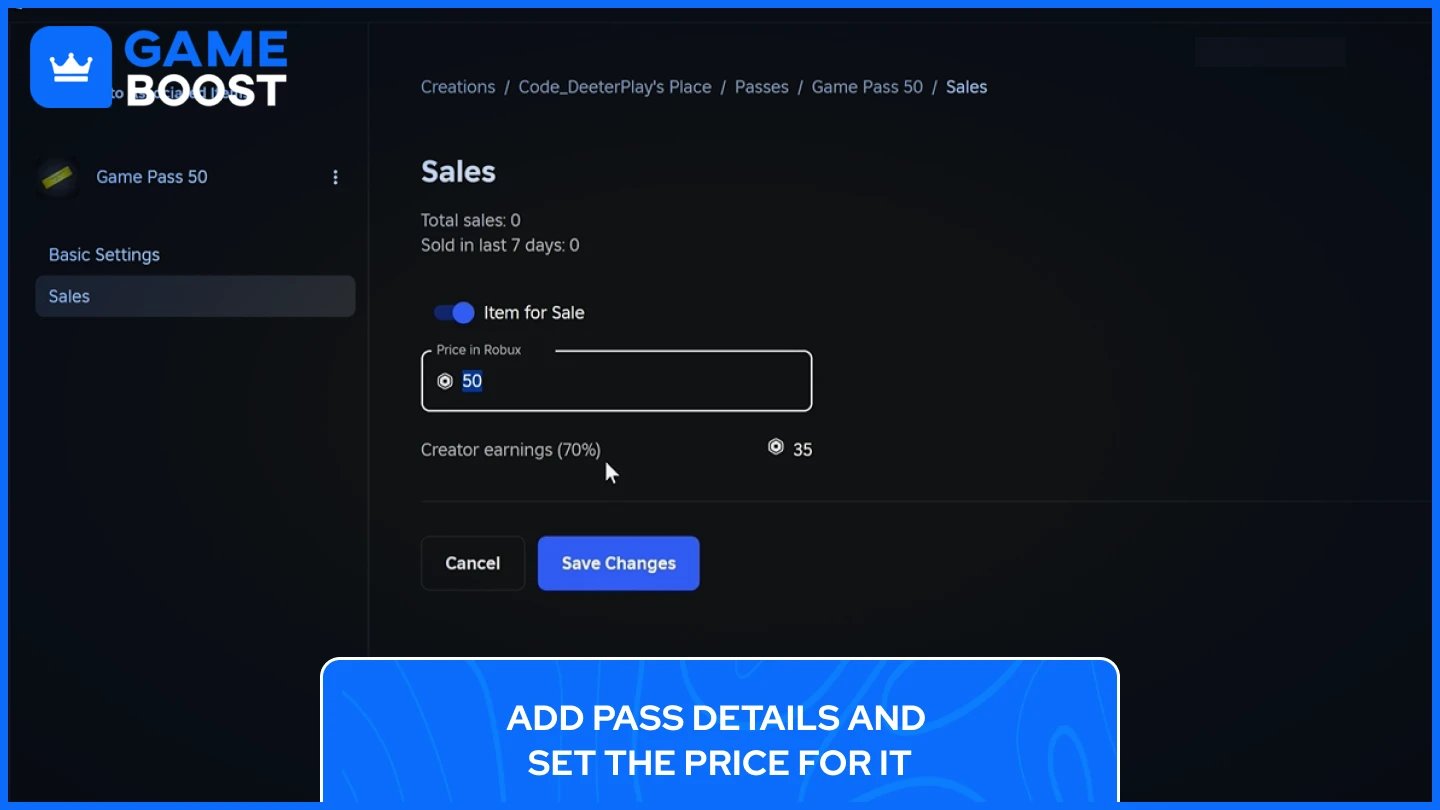
Step 4: Add Pass Details and Set the Price for It
To create a Gamepass on Roblox, you will need to fill in the required information:
Name: Give your pass a clear, descriptive name that tells players what they're getting.
Description: Explain the perks or benefits players receive. Be specific about what the Gamepass unlocks.
Image: Upload a custom image for your pass. The image must be 512x512 pixels or smaller and in .jpg, .png, or .bmp format. Make sure important details stay within the circular boundaries since Roblox displays pass icons in circles.
Once you've filled everything out, click "Create Pass" to publish it.
After creating your pass, click on it from the Passes list. In the left menu, select "Sales" and toggle the "Item for Sale" switch to ON. Enter your price in the "Price in Robux" field. Remember, you'll receive 70% of each sale, with Roblox taking a 30% marketplace fee. Click "Save Changes" to make your Gamepass available for purchase.
Step 5: Get Your Pass ID (For Scripting)
If you need to add scripting so your game automatically recognizes when players own the pass, you'll need the Pass ID. Hover over your pass thumbnail in the Passes menu, click the three dots, and select "Copy Asset ID". This ID is what you'll use in your game's code to check pass ownership and grant rewards.
Once you are finished following these steps, your Gamepass will be live. Players will be able to purchase it directly from your experience page or through in-game prompts if you've added the proper scripting.
Also Read: Active Roblox Codes and How to Redeem Them
Creating Gamepass on Roblox PLS Donate
PLS Donate works differently from regular Roblox experiences. Instead of using Gamepasses within your own game, you create them specifically to receive donations through stands in the PLS Donate game.
Here's everything you need to do to set up your PLS Donate Roblox Gamepass:
Step 1: Create Your Gamepass
Go to create.roblox.com and log in. Click "Creations" in the left sidebar, then select any of your published experiences (you can use your default place if you haven't created a game yet). Navigate to "Monetization" and click "Passes”, then hit "Create a Pass." Fill in the name and description, upload an image if you want, and click "Create Pass".
Step 2: Put It On Sale
After creating your pass, click on it from the Passes list. Go to "Sales" in the left menu, toggle "Item for Sale" to ON, and set your donation price in Robux. Click "Save Changes" to activate it. Keep in mind that you'll only receive 60% of each donation in PLS Donate (Roblox takes 30% and PLS Donate takes 10%).
Step 3: Claim Your Stand
Jump into the PLS Donate game on Roblox. Look for a stand that says "unclaimed" at the bottom. Walk up to it and hold the E key (or tap the claim button on mobile) until the stand becomes yours. Your Gamepass will automatically appear as a donation button on your stand.
That's it. Your stand is now live and ready to accept donations. You can create multiple Gamepasses at different price points to give donors more options.
Is PLS DONATE Free?
PLS Donate is completely free to play and claiming a stand costs nothing. You just need at least one Gamepass set up before your stand will display donation buttons. Once your stand is active, you can receive donations even when you're offline.
How to Create Roblox Gamepass on Mobile?
While you can't create Gamepasses directly in the Roblox mobile app, you can to use your mobile browser to access the Creator Hub. The process is nearly identical to PC once you're on the website.
Step 1: Access the Creator Hub on Mobile
Open your mobile browser and go to create.roblox.com, then log in to your Roblox account. For the best experience, switch to desktop mode in your browser settings. On Safari, tap the "AA" icon and select "Request Desktop Site." On Chrome, tap the menu and enable "Desktop site."
Step 2: Create and Customize your Gamepass
Once logged in, tap "Creations" from the menu and select the experience where you want to add your Gamepass. Scroll down to the "Monetization" section and tap "Passes," then tap "Create a Pass".
Fill in your pass name and description. Upload an image if you have one ready (optional). Tap "Create Pass" to publish it.
Step 3: Set Your Price
After creating the pass, tap on it from the Passes list. Navigate to "Sales" in the menu and toggle "Item for Sale" to ON, enter your price in Robux, and tap "Save Changes”.
Your Gamepass is now live and ready for purchase. The mobile process follows the same steps as PC, just with a slightly different navigation experience.
Also Read: How to Make Roblox Clothing: A Step-by-Step Guide
Important Things to Know About Roblox Gamepasses
Before you start selling Gamepasses, here are some critical details that will help you manage them effectively and avoid common mistakes.
When players purchase your Gamepass, they own it, but the special perks or rewards you promised won't automatically appear in your game. You need to add scripts in Roblox Studio that check if a player owns the pass and then give them their benefits (like VIP access, special items, or power-ups). Without this scripting, players who buy your Gamepass won't actually get what they paid for, which leads to refund requests and frustrated players.
Setting up automatic detection is easy if you follow Roblox's official Creator Documentation. The documentation includes sample code that checks pass ownership when players join your game and delivers their rewards instantly. You can adapt these scripts to work with any type of benefit you want to offer. This automation saves you time and creates a smoother experience for your players.
Conclusion
Creating a Gamepass on Roblox is one of the most effective ways to monetize your experience and reward your community. The process takes just a few minutes once you know where to navigate, and it works the same on both PC and mobile browsers. From setting up your first pass to automating rewards with scripts, each step brings you closer to building a sustainable revenue stream from your creations.
Start with a simple Gamepass that adds real value to your game, test it with your community, and refine your approach based on what players respond to. With the right strategy and execution, Gamepasses can transform your Roblox experience from a hobby into a genuine source of income.
Roblox & GameBoost Products
Robux Cheap
Roblox Accounts for Sale
Buy Roblox Items
View all GameBoost Accounts
View all GameBoost Boosting Services
View all GameBoost Currencies
View all GameBoost Game Keys
View all GameBoost Gift Cards
View all GameBoost Top Ups
View all GameBoost Items
Buy CS2 Skins
“ Filip Premuš is a seasoned gaming content writer specializing in titles like Steal a Brainrot, Old School RuneScape, and other popular online games. With a sharp focus on accuracy, updates, and in-game strategy, he creates comprehensive guides that help players stay ahead of the meta and make informed decisions.”